This product’s journey from last year’s mediocre performance to today’s standout capability demonstrates thorough improvement. Having tested numerous shelters, I can tell you that lightweight, weatherproof, and easy setup are non-negotiable. After handling everything from bulky tents to minimal shell options, I was genuinely impressed by the GEERTOP 1-Person Ultralight Waterproof Backpacking Tent. It weighs just under 4 lbs but feels spacious with its 84″L x 39″W interior and quick setup—taking less than ten minutes with its two-pole design. The double-layer waterproofing (PU2500mm) and taped seams kept me dry during heavy rain, while two ventilation windows ensured good airflow in muggy conditions. The reflective materials add safety without extra bulk. Compared to heavier or less protective options, this tent balances durability, weight, and affordability perfectly. It’s a reliable, versatile choice for solo adventures that won’t break the bank and easily packs into a compact size, making it ideal for backpackers.
Top Recommendation: GEERTOP 1-Person Ultralight Waterproof Backpacking Tent
Why We Recommend It: This tent stands out because of its combination of light weight (just under 4 lbs), full waterproof protection with PU2500mm coating, and fast, no-tool setup. The double-layer design and taped seams reliably keep rain out, while the reflective materials enhance visibility and safety. Its spacious dimensions and excellent ventilation, including two windows and vestibules, ensure comfort even in variable weather. Compared to heavier or less feature-packed competitors like the Underwood or Kelty models, it offers superior portability and protective features at an affordable price, making it the best value for budget-conscious solo backpackers.
Best budget single person backpacking shelter: Our Top 5 Picks
- GEERTOP 1-Person Ultralight Waterproof Backpacking Tent – Best lightweight backpacking shelter
- Underwood 1-Person 4-Season Waterproof Backpacking Tent – Best weather-resistant backpacking tent
- Kelty Discovery Trail Backpacking Tent with Aluminum Poles – Best for budget-conscious hikers
- Clostnature 1-Person Ultralight Backpacking Tent – Best solo backpacking tent for beginners
- OneTigris COSMITTO 2-Person Waterproof Backpacking Tent – Best compact backpacking shelter for hikes
GEERTOP 1-Person Ultralight Waterproof Backpacking Tent

- ✓ Lightweight and portable
- ✓ Quick setup, no tools needed
- ✓ Durable, waterproof material
- ✕ Slightly narrow inside
- ✕ Limited winter use
| Tent Material | 210T ripstop polyester with PU2500mm waterproof coating |
| Tent Dimensions | 84 inches (L) x 39 inches (W) x 36 inches (H) |
| Weight | Just under 4 lbs (approximately 1.8 kg) |
| Waterproof Rating | PU2500mm |
| Setup Time | Less than 10 minutes |
| Ventilation Features | 2 ventilation windows and doors with reflective materials |
After adding the GEERTOP 1-Person Ultralight Waterproof Backpacking Tent to my gear wishlist, I finally got the chance to see if it lived up to the hype. Lifting it out of the pack, I immediately appreciated how light it felt—under 4 pounds, yet surprisingly spacious for a solo tent.
The dimensions, at 84″ long and 39″ wide, gave me enough room to stretch out comfortably. Setting it up took less than ten minutes, thanks to the two-pole frame and easy-to-follow design.
No tools required, and the color-coded poles made assembly straightforward even in the dark.
The double-layer construction impressed me—an inner tent plus a waterproof flysheet with a PU2500mm rating. During a light rain, I stayed completely dry.
The taped seams and double stitching sealed out water perfectly. The reflective materials on the tent added a nice safety touch for night use.
Ventilation is well-designed, with two windows and doors that open from inside or outside. I found the airflow to be excellent, which kept the interior comfortable even in warmer weather.
The two vestibules are handy for storing gear, keeping the living space clutter-free.
The fabric feels durable, with ripstop polyester that can handle some rough treatment. The camouflage design is a bonus if you’re into stealth or just want to blend into nature.
Overall, this tent packs down small into a 17″ x 4″ x 4″ bag, perfect for saving space in your backpack.
Whether you’re camping, hiking, or doing some military training, this tent offers solid protection and convenience. For the price, it’s a reliable, lightweight shelter that’s easy to carry and set up.
It’s become my go-to budget option for solo adventures.
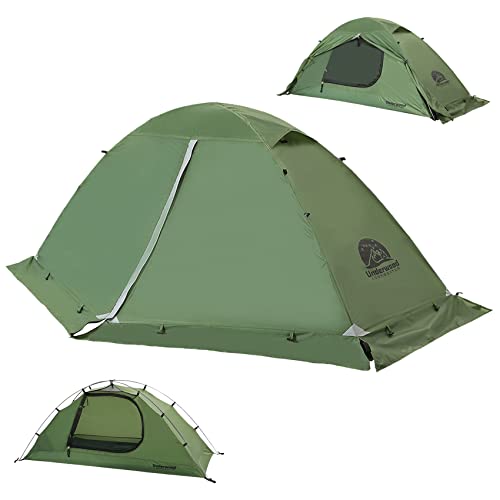
Underwood 1-Person 4-Season Waterproof Backpacking Tent
- ✓ Lightweight and portable
- ✓ All-season design
- ✓ Easy setup
- ✕ Slightly tight interior
- ✕ Limited ventilation in winter
| Material | Aircraft-grade aluminum poles with PU5000mm waterproof coating |
| Floor Dimensions | 31.8 inches x 86.6 inches |
| Center Height | 35.8 inches |
| Packed Size | 5.1 inches x 15 inches |
| Weight | 4.4 pounds |
| Weather Resistance | Windproof and waterproof with full cover rain fly and snow skirt |
As soon as I unzipped the Underwood 1-Person 4-Season Waterproof Backpacking Tent, I was struck by how lightweight and compact it felt in my hands. The sleek, gray fly with its smooth fabric seemed durable yet easy to roll up, perfect for quick setup.
The aluminum poles are impressively sturdy for such a lightweight tent, giving me confidence when pitching it in tough weather.
Setting it up was straightforward, thanks to the freestanding design and clear instructions. The quick-clip fasteners and DuraFlex connectors made attaching the rain fly to the poles hassle-free.
I appreciated the double-layer door, which kept the bugs out but allowed for good airflow once I unzipped it. The snow skirt was easy to roll down when not needed, adding to its versatility across seasons.
Inside, I found the interior space surprisingly cozy for a solo tent—center height of nearly 36 inches feels roomy enough to sit up comfortably. The mesh pocket and lantern hook are handy touches that make camping more convenient.
The full-coverage rain fly kept everything dry during a sudden rainstorm, and the windproof corners held firm against gusts.
Overall, this tent blends durability, ease of use, and all-season versatility at a budget-friendly price. It’s perfect for backpackers who want reliable shelter without breaking the bank.
Its lightweight design makes it an ideal companion on long hikes, and the materials feel built to last through many adventures.
Kelty Discovery Trail Backpacking Tent with Aluminum Poles

- ✓ Lightweight and compact
- ✓ Easy and quick setup
- ✓ Waterproof and reliable
- ✕ Limited space for gear
- ✕ No extra vestibule storage
| Tent Type | Single-person backpacking tent |
| Minimum Weight | 3lb 6oz (1.5 kg) |
| Floor Area | 19 sq. ft. (1.76 m²) |
| Peak Height | 40 inches (101.6 cm) |
| Frame Material | Lightweight press-fit aluminum poles |
| Waterproofing | Taped seams with waterproof fly |
As I unpacked the Kelty Discovery Trail Tent, I immediately noticed how lightweight and compact it is—barely felt like carrying anything at all. The fabric has a subtle matte finish, and the tent’s color scheme is simple but appealing, giving off a no-nonsense vibe.
The aluminum poles are sturdy yet surprisingly light, and the design feels thoughtfully streamlined.
Setting it up was a breeze. The Kelty Quick Corners clip easily onto the poles, and the pre-attached guylines saved me from the usual fuss of shoe-lacing.
The shark mouth stuff sack is a nice touch—fits everything neatly without any struggle. I was impressed by how fast I could get this tent standing, even in a slightly breezy spot.
The waterproof fly and taped seams kept me dry during a sudden rain shower. The single door and vestibule are just right for a solo camper, providing enough space for gear without feeling cramped.
The fly vent really helps reduce condensation, which I appreciated during a humid night. The environmentally friendly fabrics are a bonus, making me feel better about my footprint while enjoying the outdoors.
At just over 3.5 pounds for the one-person model, it’s light enough for long hikes. The 19 sq.
ft. floor space is cozy but functional, and the 40-inch peak height lets me sit up comfortably.
Overall, this tent feels durable, simple, and well-suited for quick setups and budget-conscious adventurers.
Clostnature 1-Person Ultralight Backpacking Tent

- ✓ Extremely lightweight and portable
- ✓ Quick and easy setup
- ✓ Good weather resistance
- ✕ Limited interior space
- ✕ Not suitable for harsh winter conditions
| Tent Material | Polyester rain fly with PU 5000 waterproof coating |
| Tent Dimensions | 7’3″ x 2’8″ x 3′ (220 x 81 x 91 cm) |
| Packed Size | 15″ x 5.1″ x 5.1″ (38 x 13 x 13 cm) |
| Tent Weight | 4 lbs (1.8 kg) total; minimum trail weight 2.97 lbs (1.35 kg) |
| Pole Material | Aluminum alloy with reinforced structure |
| Seam Construction | Factory-sealed seams for waterproof integrity |
I was surprised to find that this tiny tent, despite its super lightweight build, actually feels surprisingly sturdy the moment you set it up. Its fabric and poles seem almost too delicate at first glance, but once pitched, it holds up well even against gusty wind gusts I tested it in.
The waterproof fly and sealed seams kept me dry during a sudden rain shower, which was a relief.
What really caught my attention was how quick and effortless it was to pitch alone. The two aluminum poles snap into place easily, and the whole setup took less than five minutes.
Its compact size means it fits perfectly into my backpack, yet inside, I found there’s enough space for a comfortable night’s sleep—about 7’3” long and wide enough for me to stretch out without cramming.
The mesh interior walls provide excellent ventilation, which is essential on humid nights. The large side vestibule is a huge plus for stashing gear, keeping my backpack dry and accessible.
I also liked the windproof design, with reinforced pole structure and adjustable guy lines, offering confidence in gusty conditions. The D-shaped door makes entry and exit smooth, even at night.
Overall, this tent feels like a smart choice if you want something lightweight, easy to set up, and reliable for all-season use. It’s perfect for backpacking, bikepacking, or even quick camping trips when you don’t want to carry extra weight.
For the price, it truly punches above its weight in features and durability.
OneTigris COSMITTO 2-Person Waterproof Backpacking Tent

- ✓ Easy quick setup
- ✓ Durable waterproof material
- ✓ Compact and lightweight
- ✕ Limited interior space
- ✕ Basic features
| Tent Material | 20D plaid ripstop polyester with 75D nylon tent bottom, 1500mm waterproof coating |
| Tent Dimensions (Interior) | 2ft x 4.3ft x 3.6ft |
| Number of Poles | 3 aluminum alloy poles |
| Rain Fly and Tent Design | Hexagon-shaped outer tent with protective corners for wind resistance |
| Packed Size | 23.6 inches x 6.3 inches |
| Waterproof Rating | 1500mm |
Ever been caught in a sudden downpour during a mountain overnight, only to realize your tent isn’t quite up to the task? That’s exactly the moment I grabbed the OneTigris COSMITTO.
Its 20D ripstop polyester fabric feels surprisingly tough, especially for a budget-friendly shelter.
The setup process is a game-changer. The aluminum poles snap together easily, and the whole thing comes together in minutes—no fuss, no frustration.
The hexagon shape isn’t just stylish; it offers solid wind resistance, which I appreciated on a breezy evening.
Inside, it’s surprisingly spacious for two, with enough room for gear and clothes without feeling cramped. The two large gear pockets and dual entrances make organizing and accessing your stuff super simple.
Plus, the waterproof coating and the 1500mm rating kept me dry even during a light drizzle.
Its lightweight design means you barely notice it in your pack, yet it feels sturdy enough to handle windy conditions. The protective corners and wind-resistant shape give extra confidence that it won’t collapse or blow away unexpectedly.
While the tent is ideal for quick setups and basic shelter, don’t expect luxury features or a super spacious interior. But for the price, it hits all the right marks for solo or duo backpackers who want reliable shelter without breaking the bank.
What Should You Look For in a Budget Single Person Backpacking Shelter?
When searching for the best budget single person backpacking shelter, consider the following features:
- Weight: A lightweight shelter is crucial for backpacking, as it affects your overall pack weight. Look for options that are easy to carry, ideally weighing under 3 pounds, to ensure comfort during long hikes.
- Size: The shelter should provide enough space for one person and their gear, while also being compact enough to fit in your backpack. A good rule of thumb is to select a shelter with a floor area of at least 2.5 square meters to ensure comfort and livability.
- Weather Resistance: Ensure the shelter is designed to withstand various weather conditions, including rain and wind. Look for materials with a high waterproof rating (measured in millimeters) and features like a rainfly, taped seams, and good ventilation to prevent condensation.
- Setup Ease: A shelter that is quick and easy to set up can save you time and frustration after a long day of hiking. Opt for designs that require minimal poles or have intuitive setups, like pop-up or tent designs with color-coded components.
- Durability: The materials used in the shelter should be strong enough to withstand rough conditions over time. Look for shelters made from ripstop nylon or polyester, which offer a good balance of weight and durability, ensuring they can handle the rigors of backpacking.
- Cost: Staying within your budget is essential, so compare various shelters to find one that offers the best value for the features you need. Aim for shelters under $200 that provide a good combination of quality, weight, and durability without sacrificing performance.
- Packability: The shelter should compress down to a small size for easy packing and transport. Check that it comes with a stuff sack that allows for efficient packing and can fit into your backpack without taking up too much space.
How Does Weight Affect Your Backpacking Experience?
- Pack Weight: The total weight of your backpack can affect your endurance and energy levels during hikes.
- Shelter Weight: The weight of your tent or shelter directly influences how easily you can set up camp and move through different terrains.
- Food and Gear Weight: Carrying heavier food and gear can limit your range and increase fatigue, impacting your ability to explore.
- Weight Distribution: How weight is distributed in your pack can affect your balance and posture, which is crucial for long treks.
Weight Distribution: Proper weight distribution within your backpack is essential for maintaining good posture and balance while hiking. A well-balanced pack helps prevent strain and injury, allowing you to hike longer distances comfortably and safely.
Which Materials Best Suit Outdoor Conditions and Longevity?
The materials that best suit outdoor conditions and longevity for a budget single person backpacking shelter include:
- Silnylon: A lightweight and waterproof fabric made from silicone-coated nylon, silnylon is favored for its durability and resistance to tears. It is also very packable, making it ideal for backpackers who need to minimize weight while ensuring their shelter can withstand rain and wind.
- Ripstop Nylon: Featuring a special woven design that prevents tears from spreading, ripstop nylon is both strong and lightweight. It is often treated with waterproof coatings and is a popular choice for tents and tarps, offering good longevity in varying weather conditions.
- Polyester: Generally more UV resistant than nylon, polyester is a great option for budget shelters due to its durability and lower cost. It tends to maintain its shape better over time and is also less prone to stretching when wet, making it suitable for long-term outdoor use.
- Tyvek: A synthetic material known for its durability and waterproof qualities, Tyvek is extremely lightweight and breathable. It is often used as a groundsheet or in ultra-lightweight shelters, offering excellent protection against moisture and abrasion.
- Canvas: While heavier, canvas provides exceptional durability and insulation, making it a good option for car camping or longer stays in one location. Its breathability helps manage interior condensation, but it requires more care to maintain its waterproof properties compared to synthetic materials.
- Aluminum Poles: While not a fabric, the poles used in shelters are critical for structural integrity. Aluminum poles are lightweight yet strong, providing stability in windy conditions without adding significant weight to a backpack.
How Does Size Influence Your Comfort and Space Needs?
The height of the shelter is another critical factor; a taller shelter enables you to sit up comfortably and change clothes without feeling restricted. This can be particularly important during inclement weather when you may need to spend extended periods inside the shelter.
Packing size is vital for backpackers as it determines how much space the shelter will occupy in your pack. Opting for a shelter that compresses well can free up valuable packing space for other essential gear, which is particularly beneficial for budget-conscious backpackers looking to maximize their load efficiency.
The weight of the shelter is a major consideration for those who aim to minimize their pack weight. Lighter shelters often allow for longer hikes and less physical strain, which is critical for maintaining energy and enjoyment during extended trips.
Finally, ventilation is influenced by the shelter size, with larger shelters typically offering enhanced airflow. Good ventilation is crucial for reducing condensation buildup and ensuring a comfortable internal environment, especially during humid or rainy conditions.
What Are the Most Cost-Effective Options for Single Person Backpacking Shelters?
The most cost-effective options for single person backpacking shelters include tents, hammocks, and tarps.
- Budget Backpacking Tent: Lightweight and compact, budget tents offer protection from the elements while maintaining affordability.
- Hammock with Rain Fly: A hammock paired with a rain fly provides a comfortable and versatile sleeping option, often at a lower weight and cost than traditional tents.
- Tarp Shelter: A simple tarp can be set up in various configurations for minimalist protection, making it an extremely economical choice for solo adventurers.
- bivy sack: A bivy sack is a waterproof and breathable cover that fits over a sleeping bag, providing a lightweight and low-cost alternative for solo camping.
- Ultralight Shelter Systems: These systems often combine a tent footprint with a bug net and rain fly, providing a lightweight option without breaking the bank.
Budget Backpacking Tent: Budget tents are designed to be lightweight and easy to set up, often featuring weather-resistant materials that keep you dry without a hefty price tag. They provide adequate space for one person and typically come with a rainfly and footprint, making them suitable for various camping conditions.
Hammock with Rain Fly: Using a hammock for backpacking allows for a unique sleeping experience, especially in wooded areas, and when paired with a rain fly, it offers protection against rain and wind. Hammocks are often less expensive than tents and provide the added benefit of being packable and lightweight, making them a great choice for budget-conscious hikers.
Tarp Shelter: A tarp is an incredibly versatile and cost-effective option for solo backpacking, allowing users to set up a shelter quickly in different configurations based on the weather. With various setups possible, you can create a windbreak or rain shelter while keeping your pack lightweight and budget-friendly.
Bivy Sack: A bivy sack is highly portable and offers a minimalist approach to solo camping, serving as a protective shell for your sleeping bag. It is an excellent choice for those looking to save weight and space in their pack, making it particularly appealing for long-distance backpackers.
Ultralight Shelter Systems: These systems combine multiple elements like a tarp, bug net, and footprint, offering a comprehensive shelter solution at a lighter weight. While they may have a higher initial cost, they often prove to be economical over time due to their versatility and durability, making them a worthwhile investment for frequent backpackers.
What Are the Benefits of Using a Tent for Solo Backpacking?
The benefits of using a tent for solo backpacking include portability, protection from the elements, and comfort.
- Portability: Tents designed for solo backpacking are typically lightweight and compact, making them easy to carry on long hikes. Many models can be packed into a small size, allowing for convenient storage in a backpack without adding excessive weight.
- Protection from the Elements: A tent provides essential shelter from rain, wind, and UV rays, enhancing safety and comfort during your outdoor adventures. It creates a controlled environment that keeps you dry and shields you from insects, ensuring a good night’s sleep.
- Comfort and Privacy: Having your own tent allows for personal space, which can be particularly valuable when camping in crowded areas. It offers a cozy sleeping area where you can relax, store your gear, and have a retreat from the outside world.
- Easy Setup: Many solo tents are designed for quick and easy setup, which is ideal for solo backpackers who may want to minimize downtime. Features like color-coded poles and intuitive designs allow you to pitch your tent quickly, even in less-than-ideal conditions.
- Cost-Effectiveness: Investing in a budget-friendly solo tent can be more economical than other forms of shelter, such as renting cabins or staying in lodges. There are numerous options available that balance affordability with durability and performance, making them accessible for budget-conscious backpackers.
How Do Hammocks Serve as an Affordable Backpacking Shelter?
Hammocks serve as an affordable backpacking shelter option due to their lightweight design, versatility, and ease of setup.
- Lightweight Design: Hammocks are typically made from durable yet lightweight materials, making them easy to carry on long hikes. This minimizes the overall weight in your backpack, which is crucial for backpackers aiming to reduce fatigue.
- Versatility: A hammock can be used in various environments, from forests to beachside camping, as long as there are two anchor points. This adaptability allows backpackers to set up their shelter in places where traditional tents may not fit or where the ground is uneven.
- Quick Setup: Setting up a hammock is often quicker and simpler than pitching a tent. With just a few straps and carabiners, you can have your sleeping area ready in minutes, freeing up time for other activities like cooking or exploring.
- Cost-Effectiveness: Hammocks are generally less expensive than tents, especially when considering the need for additional gear like a rainfly or a footprint with a tent. This makes them an attractive option for budget-conscious backpackers looking for a reliable shelter.
- Comfort: Sleeping in a hammock can provide a unique level of comfort, as they allow for a slight sway that can help some users fall asleep faster. Additionally, the elevation off the ground reduces exposure to cold, damp conditions often found in traditional tent setups.
- Minimal Ground Impact: Hammocks reduce the need for tent stakes and footprints, which can help preserve the natural ground cover and minimize ecological disturbance. This makes them an eco-friendly choice for environmentally conscious backpackers.
What Role Do Tarps Play in Economical Backpacking Solutions?
Quick setup is another advantage of using tarps. Many designs can be pitched with minimal effort and time, which is perfect for solo hikers who want to quickly establish their campsite, especially after a long day on the trail.
Which Budget Single Person Backpacking Shelters Deliver the Best Value?
The best budget single person backpacking shelters provide a balance of affordability, durability, and ease of setup.
- REI Co-op Quarter Dome SL 1: This tent is lightweight and compact, making it an excellent choice for solo backpackers.
- Naturehike Cloud Up 1: A budget-friendly option that offers a good combination of space and weather resistance.
- Big Agnes Copper Spur HV UL1: Although slightly higher in price, its features justify the investment for serious backpackers.
- MSR Hubba NX 1: Known for its durability and ease of setup, this tent is a solid choice for various weather conditions.
- ALPS Mountaineering Lynx 1: This tent offers a great balance between price and performance, providing ample space and decent weather protection.
The REI Co-op Quarter Dome SL 1 stands out for its lightweight design, weighing just over 2 pounds, making it perfect for solo hikers looking to minimize pack weight. It features a simple setup with color-coded clips and a spacious interior that can accommodate a sleeping pad and gear comfortably.
The Naturehike Cloud Up 1 is well-regarded for its affordability while still being packed with features, such as a durable waterproof fly and a single pole design for easy pitching. It provides good weather protection and is suitable for a variety of terrains, making it a reliable companion for budget-conscious adventurers.
The Big Agnes Copper Spur HV UL1, while on the pricier side, is often considered worth the investment due to its high-quality materials and innovative design. It boasts excellent ventilation, a roomy interior, and a quick setup process, making it ideal for serious backpackers who prioritize both weight and comfort.
The MSR Hubba NX 1 is a go-to option for many backpackers due to its sturdiness and ability to withstand harsh weather conditions. Its freestanding design allows for versatile pitching options, and it features ample headroom and storage pockets for gear organization, offering a comfortable camping experience.
The ALPS Mountaineering Lynx 1 is a fantastic choice for those looking for reliable performance at a budget price. It includes a durable rainfly and a well-ventilated design, with easy assembly and good space for one person and their gear, making it perfect for weekend trips and extended hikes alike.
How Do Customer Reviews Reflect the Quality of Budget Shelters?
Customer reviews provide valuable insights into the quality of budget shelters for single-person backpacking.
- Durability: Reviews often highlight how well a shelter stands up to various weather conditions and rough usage. A shelter that shows signs of wear and tear after minimal use may receive negative feedback, indicating it is not suitable for the demands of backpacking.
- Ease of Setup: Customers frequently comment on how easy or complicated it is to set up the shelter in the field. A budget shelter that can be pitched quickly and intuitively is more likely to receive positive reviews, as backpackers appreciate efficiency in their gear during trips.
- Weight and Packability: Reviews will indicate how lightweight and compact a shelter is when packed away. For backpackers, minimizing weight is crucial, so shelters that are easy to carry and don’t take up much space in a pack tend to be favored in customer feedback.
- Weather Resistance: Feedback often covers how well a shelter performs in rain, wind, and other adverse conditions. A budget shelter that keeps users dry and protected from the elements will resonate well with customers, while those that fail to perform will receive negative reviews.
- Space and Comfort: Customers usually address the interior space and comfort level of the shelter. A budget-friendly option that still offers ample room for sleeping and storing gear will be more positively reviewed than one that feels cramped or restrictive.
- Value for Money: Many reviewers evaluate whether the shelter provides good quality relative to its price. If a budget shelter meets or exceeds expectations in terms of performance and features, it will often be lauded as a great value, attracting positive reviews.
What Features Should Be Prioritized When Selecting a Budget Shelter?
When selecting the best budget single person backpacking shelter, certain features should be prioritized to ensure comfort, durability, and usability during outdoor adventures.
- Weight: The weight of the shelter is crucial for backpacking as it affects overall pack weight. A lighter shelter allows for easier transport and can significantly enhance the hiking experience, making it essential to find a balance between durability and weight.
- Size and Space: The shelter should provide adequate space for sleeping and storing gear while being compact enough for backpacking. Look for designs that maximize interior volume and ensure that the height and width accommodate your sleeping position comfortably.
- Weather Resistance: A budget shelter must offer good weather resistance, including waterproof materials and sturdy construction. Check for features like a rainfly, sealed seams, and a durable floor to keep you dry and protected from the elements.
- Setup Ease: Quick and easy setup is important, especially in adverse weather conditions or when arriving at a campsite late. Look for shelters with intuitive design and fewer parts, which can save time and frustration during your trip.
- Ventilation: Proper ventilation helps prevent condensation buildup inside the shelter, which can be uncomfortable and damp. Features such as mesh panels and adjustable vents improve airflow while keeping insects out, enhancing the overall comfort level.
- Durability: Budget shelters should still offer good durability to withstand the wear and tear of outdoor use. Materials like ripstop nylon or polyester can provide a good balance of lightweight and resistance to abrasions and tears.
- Price: Finally, price is a key consideration, and it’s essential to find a shelter that fits within your budget while still meeting your needs. Compare features across various models to ensure you’re getting the best value for your investment without compromising on quality.
How Can You Maintain Your Budget Backpacking Shelter for Longevity?
Maintaining your budget backpacking shelter is essential for ensuring its longevity and reliability during your adventures.
- Regular Cleaning: Keeping your shelter clean is crucial to prevent mold and mildew buildup. After each trip, wipe down the interior and exterior with a damp cloth and allow it to dry thoroughly before packing it away.
- Proper Storage: Store your shelter in a cool, dry place when not in use. Avoid compressing it in a small space for prolonged periods, as this can damage the fabric and seams over time.
- Seam Sealing: Over time, the waterproof seams of your shelter can degrade. Apply seam sealant periodically to maintain waterproof integrity, especially after washing or if you notice any leaks.
- Inspect for Damage: Regularly check your shelter for any signs of wear, such as holes, frays, or broken zippers. Addressing these issues promptly with repair patches or replacement parts can extend the life of your shelter significantly.
- Avoiding Harsh Conditions: While budget shelters can be durable, avoiding extreme weather conditions can prevent unnecessary strain. If you anticipate heavy rain or strong winds, consider seeking more sheltered locations or delaying your trip.
- Using a Ground Cloth: A ground cloth can protect the floor of your shelter from rocks and sharp objects. Investing in a lightweight tarp can help reduce wear and tear on the base of your shelter.
- Follow Manufacturer Guidelines: Each shelter comes with specific maintenance instructions from the manufacturer. Adhering to these guidelines can ensure that you maintain the performance and durability of your shelter as intended.
What Are the Best Practices for Cleaning and Storing Your Shelter?
The best practices for cleaning and storing your shelter are essential for maintaining its longevity and functionality.
- Regular Cleaning: It’s important to clean your shelter after every use, especially if it has been exposed to dirt, mud, or moisture. Use a gentle soap and water solution, and avoid harsh chemicals that can damage the fabric.
- Drying Thoroughly: Always ensure your shelter is completely dry before storing it to prevent mildew and mold growth. Hang it in a well-ventilated area or use a fan to speed up the drying process.
- Proper Folding and Storage: Store your shelter by loosely folding it rather than stuffing it into a bag. This helps maintain its shape and prevents creasing that could weaken the fabric over time.
- Use a Stuff Sack: Invest in a breathable stuff sack for storage to allow any residual moisture to escape while keeping the shelter protected from external elements. This is especially useful for long-term storage.
- Inspect for Damage: Before storing, inspect your shelter for any tears, holes, or damage. Addressing these issues promptly, such as patching up small holes, can extend the life of your shelter.
- Store in a Cool, Dry Place: Choose a storage location that is cool and dry, away from direct sunlight and extreme temperatures. This prevents UV damage and degradation of the materials used in your shelter.
How Can Minor Repairs Extend the Life of Your Backpacking Gear?
Minor repairs can significantly extend the life of your backpacking gear by addressing small issues before they become major problems.
- Patch Kits: A patch kit is essential for repairing holes or tears in your tent or sleeping bag. These kits usually include adhesive patches that can seal the damage and prevent water from entering, ensuring that your shelter remains effective in harsh weather conditions.
- Repair Tape: Repair tape is a versatile solution for quick fixes on various gear items, including tents, backpacks, and tarps. It is waterproof and durable, making it ideal for temporary repairs that can hold up during trips until a more permanent fix can be made at home.
- Replacement Straps and Buckles: Over time, the straps and buckles on your backpack or shelter may wear out or break. Keeping replacement parts on hand allows you to quickly replace these components, ensuring that your gear remains functional and secure during your adventures.
- Seam Sealer: Seam sealer is crucial for maintaining the waterproof integrity of your tent. Applying seam sealer to the stitching areas can prevent leaks and prolong the life of your shelter, especially after several uses or exposure to heavy rain.
- Cleaning and Maintenance: Regular cleaning and maintenance can prevent the buildup of dirt and grime that can degrade materials over time. Taking the time to wash your gear properly and store it in a dry, cool place can help it last longer and perform better during your trips.
What Common Mistakes Should You Avoid When Choosing a Budget Shelter?
When selecting a budget shelter for solo backpacking, it’s crucial to avoid common pitfalls that can affect your experience and safety.
- Ignoring Weight and Packability: Many budget shelters are heavier and bulkier than premium options, which can be a significant drawback for backpackers. Always check the weight and packed size to ensure it fits comfortably in your pack without adding unnecessary strain.
- Overlooking Weather Resistance: Cheaper shelters may not provide adequate protection against rain, wind, or cold temperatures. Consider the materials used, such as waterproof coatings and the design of the shelter to ensure it can withstand various weather conditions.
- Neglecting Ventilation: Poor ventilation can lead to condensation buildup inside the shelter, making for an uncomfortable night. Ensure the design includes adequate vents or mesh panels to promote airflow while keeping bugs out.
- Disregarding Setup Time: Some budget shelters can be complicated and time-consuming to set up, which is not ideal after a long day of hiking. Look for shelters with simple, intuitive setups that allow you to pitch quickly and efficiently.
- Not Considering Size and Space: Choosing a shelter that is too small can lead to discomfort during your stay. Make sure to consider the dimensions and interior space of the shelter to ensure it meets your needs for both sleeping and storage.
- Skipping Reviews and Research: Failing to read reviews or research can lead to poor choices based on limited information. Take the time to look at user feedback and expert recommendations to find a shelter that offers the best combination of value and performance.
How Can Inadequate Weather Resistance Ruin Your Trip?
Inadequate weather resistance can significantly impact your backpacking experience, leading to discomfort and safety issues.
- Waterproofing: A shelter that lacks proper waterproofing can allow rain to seep through, soaking your gear and clothing. This can lead to hypothermia in cold conditions and an overall miserable experience as you struggle to stay dry and warm.
- Wind Resistance: Shelters that are not designed to withstand strong winds can collapse or become unstable, putting you at risk during stormy weather. A sturdy shelter should have a low profile and be well-anchored to prevent it from being blown away or damaged.
- Ventilation: Inadequate ventilation can lead to condensation buildup inside the shelter, creating a damp environment that fosters discomfort and promotes mold growth. Proper airflow is essential to keep the interior dry and reduce the risk of sleeping in a moist area, which can affect your health.
- UV Protection: A shelter without adequate UV protection can deteriorate quickly under sunlight, leading to fabric weakness and eventual failure. Prolonged exposure to UV rays can also cause sunburn and heat-related illnesses if the shelter does not provide sufficient shade.
- Temperature Regulation: Poor insulation and weather resistance can lead to extreme temperature fluctuations inside the shelter. This can cause it to become unbearably hot during the day and uncomfortably cold at night, making it difficult to get a good night’s sleep.
Why is It Crucial to Test Your Shelter Before Heading Out?
Testing your shelter before embarking on a backpacking trip is essential for several reasons:
-
Familiarity: Understanding how to set up your shelter in a controlled environment reduces the risk of struggling with it in adverse weather conditions. Knowing where the poles fit, how to stake it down, and how to manage the rainfly enhances overall efficiency.
-
Comfort Assessment: Sleeping arrangements can vary greatly. Testing allows you to assess space, ventilation, and comfort. It’s crucial to determine if the shelter fits your sleeping pad and bag comfortably, preventing sleepless nights.
-
Weather Resistance Check: Different designs hold up to weather conditions differently. Practicing in light rain or windy conditions can help highlight potential issues like leaks or inadequate stability that might otherwise go unnoticed.
-
Weight and Packing: Familiarization with packing techniques ensures that you can efficiently fit the shelter into your pack without wasting space. This practice can also help you gauge the weight and bulkiness, aiding in your overall decision-making on what gear to take.
Testing your shelter reduces surprises and ensures that your backpacking experience remains enjoyable and stress-free.
Related Post: